How to optimize images for SEO
In the world of SEO there are thousands of little things that can be done. Sure it’s the little things, but all of those little things will add up and can make a big difference. One of those things we are going to talk about today are images. So let’s get started.
Optimal Image Sizing
The file size of your image can affect your website’s performance, specifically the loading speed of a webpage. Having a large image size can add seconds to a page’s loading time, which leads to a bad user experience. If that page takes time to load the user may just move on or leave your site entirely.
So what is the ideal file size? We suggest the image size should be no bigger than 400 kilobytes (0.4mb). Testing has shown that web page speeds load faster when all images are of this size or smaller.
“But what about PNG or JPG images?”
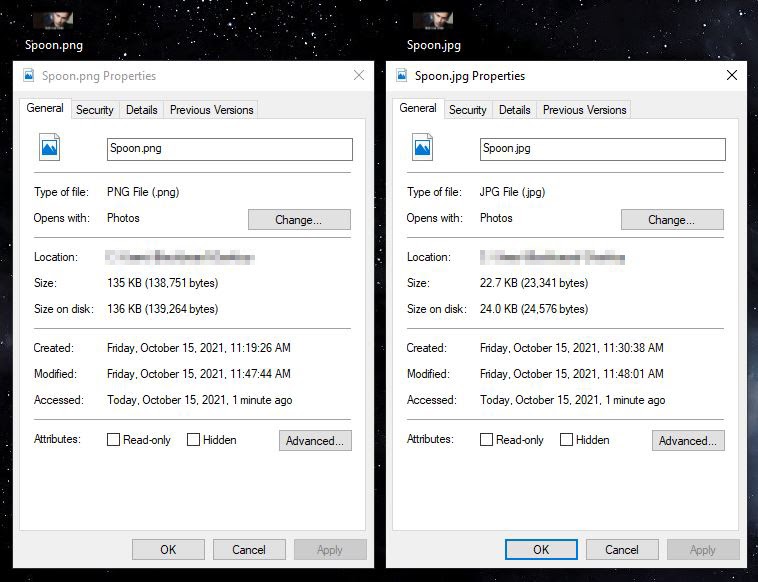
Well this is an easy one. .PNG is good for images that need a transparent background and quality while .JPG is great for compression, but lacks in quality. Let’s compare the two.

The details on the left are for the .PNG image while the details on the right contain the .JPG image.
Everything is the same, except for the extension in which the image was saved as. You can easily tell the difference in size as the JPG picture is the smallest. Let’s look at both pictures and see if there is a difference.
PNG image:

JPG image

As you can tell we have some pixelation in the JPG image, while the PNG image looks great.
“So in what case should I use JPG images?”
If you need to display an image with the dimensions of 1000 x 1000 or bigger, you should use JPG.
“But what about big images with quality?”
We have another option and that is a CDN, A Content Delivery Network can help speed up your page load speed. They cache your website on multiple servers throughout the world helping with the performance. If you have a need for displaying large images, then this may be an option for you.
In short the goal here is to have your images no bigger than 400kb. So feel free to save those images as a .PNG. If you have a lot of images on a webpage, then lazy loading may be something you might want to look into.
Property Practices with Alt Tags and Names
Alt Tags are basically a description of the image on your website. This helps Google understand what that image is and it’s good for accessibility for users who are unable to see them. You shouldn’t keyword stuff Alt Tags, but it’s a great way to throw in one of your target keywords.
The name of the photo also plays an important role. You want to avoid uploading images that contain random text or pre generated text from the camera, such as “20211018_204023” or “IMG_0045”. Adding a keyword in the name is a good way to improve seo, however be aware of keyword stuffing!
Let’s say you have a picture of a beach house. It is a vacation rental located in Myrtle Beach.

The first example does the job, but it could be more descriptive and we can add a keyword.
<img src=”Vacation-rental-beach-house.jpg” alt=”Beach House”>
The second example contains target keywords, but it could be more descriptive.
<img src=”Vacation-rental-beach-house.jpg” alt=”Myrtle Beach Vacation Rental”>
The third example contains target keywords and is more descriptive than the others. This is a good start
<img src=”Vacation-rental-beach-house.jpg” alt=”Blue oceanfront vacation rental home in Myrtle Beach”>
Image sitemap
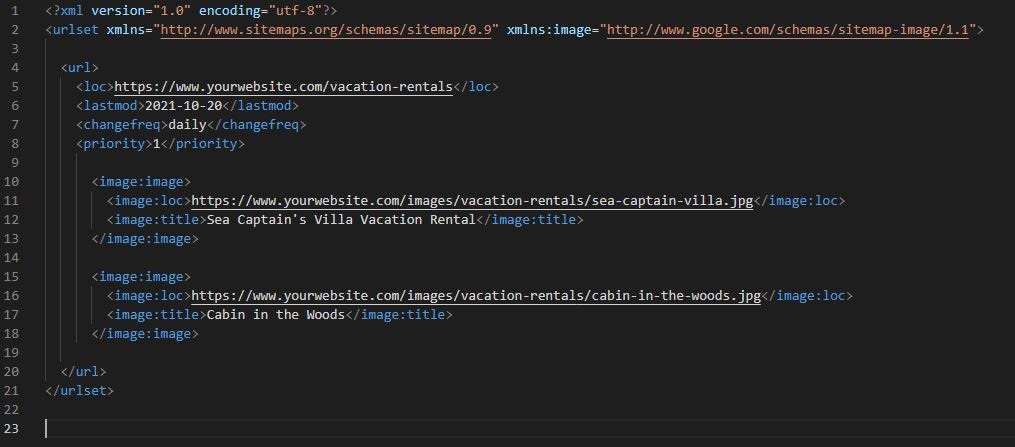
You have heard of a sitemap that helps crawlers find the pages on your website, but have you heard of an image sitemap? You can add images to your current sitemap or create one just for images. Adding images to a sitemap helps Google discover images that they might not otherwise find. This is a great way to gain traffic and awareness of your brand. Selling merch? Installing pools? Have a large collection of vacation homes for rent? The image tab in Google is often overlooked by website owners and it is a missed opportunity to promote your brand.

This looks like a lot, but it’s really simple. I used a tool to help generate the sitemap. Once you generate a sitemap go ahead and double check it by opening it in your favorite editor. Make sure there is nothing funky going on as tools can give odd results from time to time. If everything checks out then you are ready to upload it to your site. (Just make sure to tell Google about it in Google Search Console)
Geotagging images
The last topic we will be talking about today is geotagging your images. A method that has been proven to increase website visibility. This helps search engines make the connection between your photo and the location of where it was taken. Although you may not notice an improvement in traffic, it’s the little things that count. Before uploading the picture to your website, check the details of the image. Your camera can add location data to the photo. If that feature is turned on then you are set. If you have a photo that does not have location data embedded, then there are online tools that can do the job for you.
So we have talked about some ways to optimize images for your website. Although these tips to optimize images for SEO will not make a huge boost in traffic, it will help your site in the long run. Remember it is the many little things that count and the more you do the better it will be for your website.
 866.249.6095